

This was a fun challenge to work on from start to finish. Taking a box set and breaking it up amongst painters of different styles and backgrounds was a great idea. Seeing every ones take on a fig from the same box is really neat, and a reminder that there is no one right way to paint or model. It's the variety of styles and technique that make this so interesting.

Step 1: Get a fig from the box. I like to go nuts on a figure every once in a while and do as much as I can to it to stretch my modeling and painting skills. While looking over the sprues, I noticed no one had taken the standard yet, and I suddenly had green stuff visions of the future. I wasn't sure about the alternate hand yet, so I grabbed a shield arm and a weapon arm to try some different looks before settling.
 Step 2: Test poses and design. I wanted to change the pose so I started looking at the torso to see where I could make alterations. One of the legs had a semi straight line that I could cut along, so off comes a leg and a little greenstuf later its now raised up so he can be stepping up the rocky outcrop base I've got in the back of my mind. Now for the arms. I started looking at the shield arm, and it was just a cool little piece, so I decided it needed to stay. Then I was looking at the other club/morningstar arm and hand the thought, what if I combine these? I did a quick test and it looked like it would work, though it would look a little busy. So I thought, why not make "busy" the theme of the fig? This is the gor who wants to be everything. A warband unto himself. Maybe if I pull this off he'll even look cool doing it.
Step 3: Make it happen. Idea now solidified, I begin assembling the figure. I decide I want to use the standard arm, so I dig through a bitz box and find a dark elf spear that looks like it could be the blade of a poleaxe. Some greenstuff around the end of the pole and another spearhead later, a poleaxe is born. So now hes got his poleaxe, shield, and morningstar, how to attach the standard? Going with the one man warband theme, I decided to have it tied around his waist and shoulders. I attached a plastic tube for the pole of the standard and then wrapped some string around it to make it look like it was secured by rope. I tried greenstuff at first, but sculpting that much rope was going to take forever, so that idea went out the window.


 I am always changing my idea as I build a fig, which is not the best way to go about things sometimes. At this point I decided the standard looked too plain and flat given the rest of the movement going on in the figure. So I clip off the skulls hanging from the side of the banner. I roll out some greenstuff and flatten it(with a little vasaline on the board to make it easy to pick it back up) and cut it into roughly the same kind of shape that I snipped off. I attached the skull to the bottom and then once it was cured attached it to the standard. Repeat the process for the other side and now the banner has some movement, but still looks a little plain, and my joins of greenstuff to banner are a little visible. I decide to add more fur to the top of the standard, and then add some more skulls hanging from the top. The gor already had a skull hanging on his leg and the standard had one too, so a few more can't go amiss right? In the grim darkness of the future there are only skulls ... oh wait, wrong GW game. At some point during this process I broke the chain off the weapon and cursed u pa mighty storm. It was not easy to re-attach and it took a few attempts to get it back on and looking right. Using superglue to fix it in place really kept the in motion aspect I was going for with the whole thing though.
Use stuff to shape the greenstuff. I notice a lot of greenstuff work is flat and in one plane. I like to get bends and curves out of it by draping it over things while it cures to give it more natural irregular shapes. In this case, the first banner part was wrapped around a pen while it cured, and the second was arranged with a pipe cleaner so I could see it in place and let it cure in just the right spot.
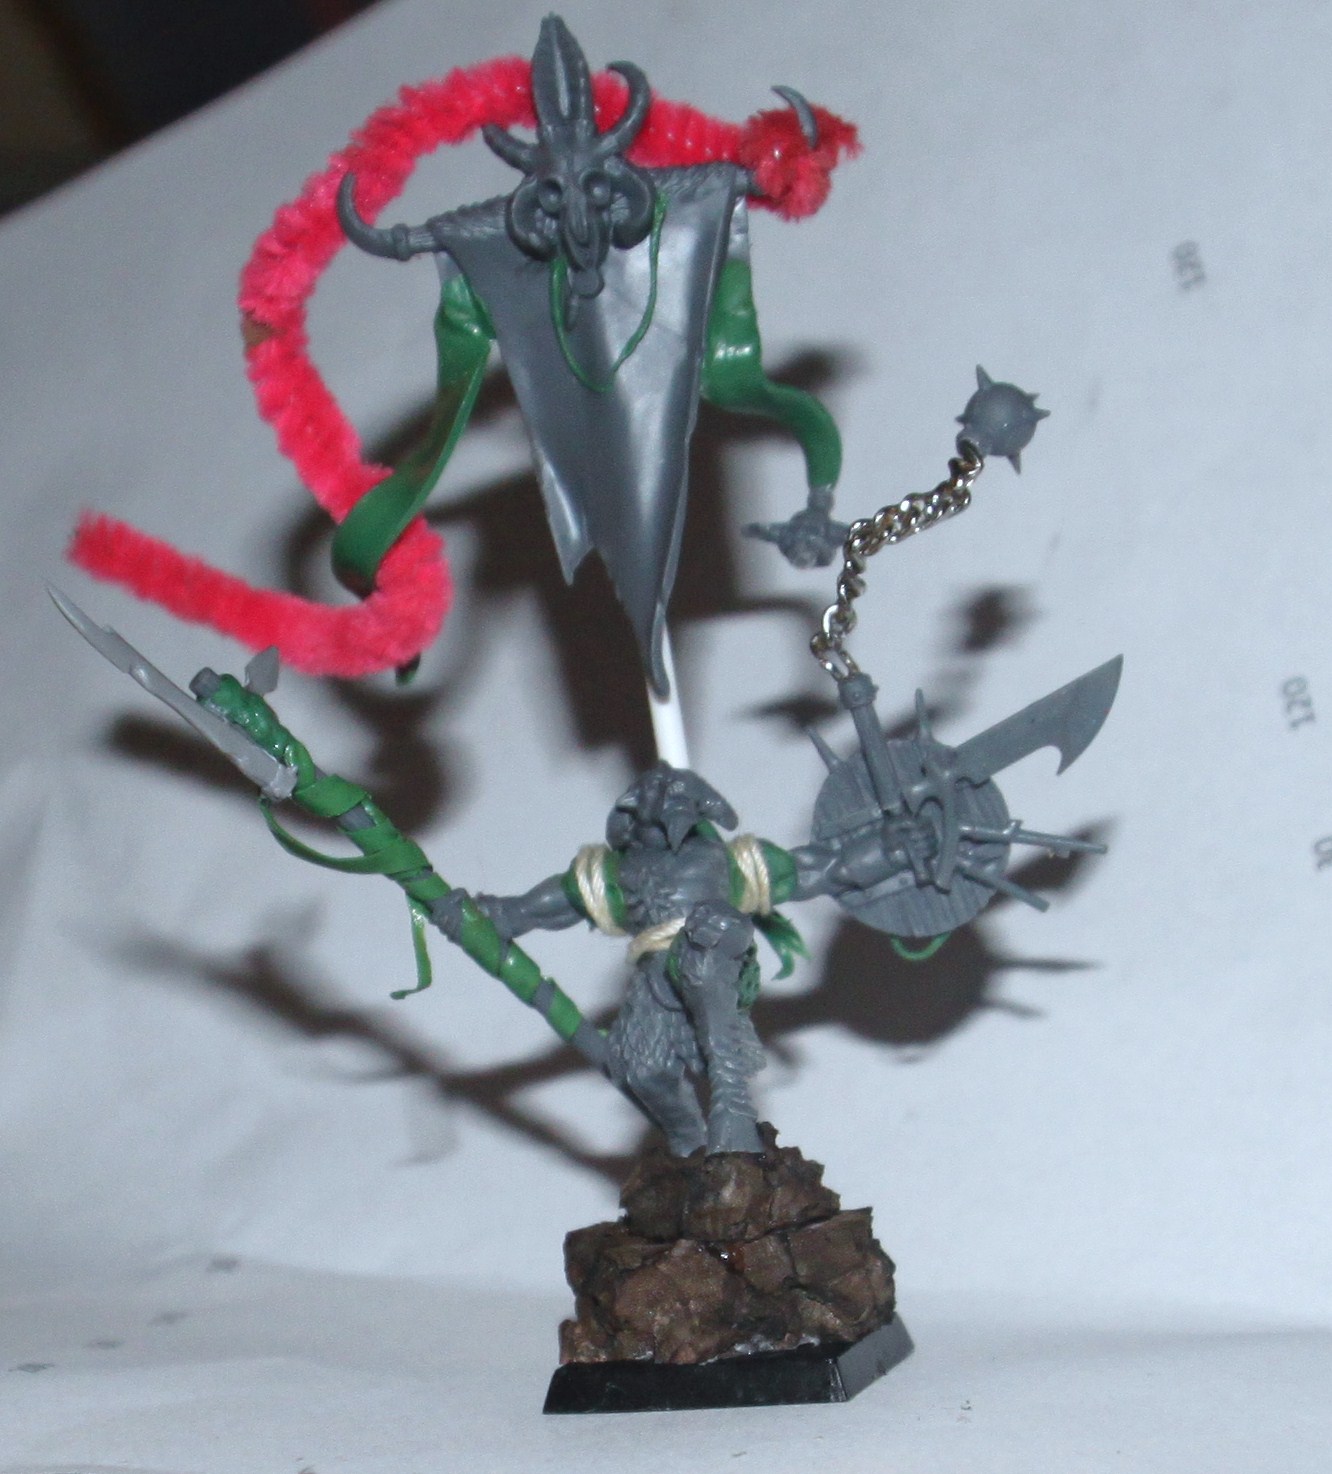
Step 4: The base, Since the figure was so involved I kept the base pretty simple, a rocky outcrop made of corkboard, just big enough to give him reason to be stepping up. I skipped adding sand or anything else, I jsut wanted the rock texture and once painted I would only add some static grass/flock mix and some odds and ends plant misc. stuff to try and make it look natural.

 Step 5: Painting! This actually took the longest since I have a very busy work schedule this time of year. I mostly snuck in 15 min here and there before or after work, trying to just add one color or layer at a time. The nice thing about this method of painting in little bits over a longer timeframe is that it makes it easier to be patient. There's no rush to slap as much paint as you can on in one sitting when you know you only hive time for one application of color at this sitting. I layered a darker flash color in, and then brought up some higlights, then blocked out an even darker brown for the fur. I tried to highlight the fur with different shades, but in retrospect this is one area that I think i dropped the ball a bit, the two areas of flesh and fur don't separate enough I don't think. They ended up too similar. I used wet blending on the banner and some of the muscles, trying to get some nice color transitions. I always struggle with contrast, I never go quite dark enough or light enough with my shading and highlighting, even though while actually painting I always think that it's too much already. I wet blended all the horns as well, trying for a natural dark to light fade on the horns. I also tried some non-metal metal on the weapons and metal areas, and then brushed a very watered down silver over them so it ends up being a shaded silver metal. Painting the string was a real pain, it was difficult to get color to stay where I wanted it, and even after the base coat it still absorbed paint for a little while, making it take several coats of base and highlight/shadow to get it to look sort of right.
Thanks for taking a gander at my beasty, Feedback and comments are always appreciated!

I really like the string on the model. It may have been a pain to paint but it looks great!
ReplyDeleteThis is so cool! Nice work Meph! Really like the whole one man warband concept, I think you pulled it off brilliantly!
ReplyDeleteThanks for finally getting around to posting. You clearly have some great stuff to contribute you really oughta think about posting more. :D
Very nice work on this. Great job on the conversion and going the extra mile. Put us all to shame.
ReplyDeleteGood stuff Meph! I haven't always liked your conversions but this one just leaps out and says this Gor is one bad mamma jamma
ReplyDelete